Configuration réseau et Firewall
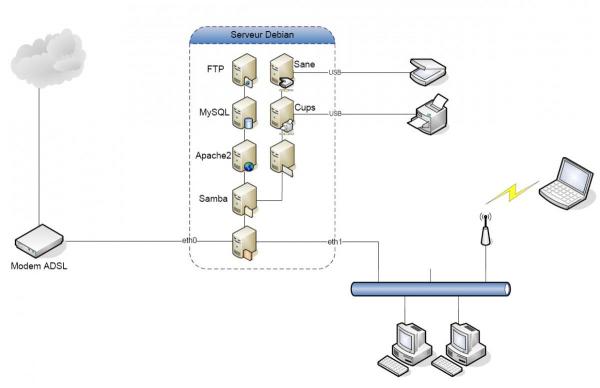
- Architecture Physique complète du réseau
Ce schéma illustre un exemple d’architecture qui peut être mise en place sur votre réseau.
Pour que tous ces services communiquent correctement et que votre réseau reste sécurisé, nous allons nous efforcer de configurer la structure physique et le firewall du serveur.

- Structure physique
Pour la suite, nous définirons que la carte réseau desservie par le modem ADSL sera l’interface eth0 (Out) et que la carte réseau desservant le LAN sera l’interface eth1 (In).
Si votre configuration actuelle ne correspond pas, vous pourrez soit adaptez ce qui suit à vos besoins, soit modifiez le nom des interfaces pour qu’ils correspondent.
- Modification du nom des interfaces réseaux
Pour effectuer cette opération, il vous suffit d’éditer le fichier suivant /etc/udev/rules.d/70-persistent-net.rules :
nano /etc/udev/rules.de/70-persistent-net.rules
Vous trouverez dans ce fichier une ligne par interface réseaux de votre serveur sous la forme suivante :
SUBSYSTEM=="net", ACTION=="add", DRIVERS=="?*", ATTR{address}=="6c:62:6d:b4:b0:7d", ATTR{dev_id}=="0x0", ATTR{type}=="1", KERNEL=="eth*", NAME="eth1"
Comme vous pouvez le voir, l’option NAME=”ethx” définit le nom de l’interface, il vous suffit alors de l’adapter à votre convenance et de sauvegarder.
Vous pourrez alors redémarrer le serveur pour que la nouvelle configuration soit prise en compte.
- Mise en place de la configuration réseau
Commencez par éditez votre fichier /etc/network/interfaces :
nano /etc/network/interfaces
et modifiez le de la manière suivantes (adaptez les adresses IP en fonction de vos besoins) :
# This file describes the network interfaces available on your system
#and how to activate them. For more information, see interfaces(5).
# The loopback network interface
auto lo
iface lo inet loopback
# The primary network interface(WAN)
auto eth0
iface eth0 inet static
        address yyy.yyy.yyy.yyy #Ip Address Wan Side
        netmask 255.255.255.0 # Network Mask
        dns-nameservers yyy.yyy.yyy.yyy #DNS Ip Address (Modem)
        broadcast yyy.yyy.yyy.255 #Broadcast Ip Address
        gateway yyy.yyy.yyy.yyy #Modem Ip Adress
auto eth1
iface eth1 inet static
        address zzz.zzz.zzz.zzz #Ip Address Lan Side
        netmask 255.255.255.0 # Network Mask (Class C Network)
        broadcast zzz.zzz.zzz.255 #Broadcast Ip Address
Sauvegarder le fichier.
Pour activer cette configuration, relancez le service Networking :
service networking restart
- Mise en place d’un Firewall/Passerelle avec Iptables
Placez vous dans le répertoire /etc/init.d :
cd /etc/init.d
Créez un fichier « Firewall » et copiez-y le script suivant :
#!/bin/bash
### BEGIN INIT INFO
# Provides:          Firewall
# Required-Start:    networking $remote_fs $syslog
# Required-Stop:     networking $remote_fs $syslog
# Default-Start:     2 3 4 5
# Default-Stop:      0 1 6
# Short-Description: Service Firewall
# Description:       Definit les regles du pare-feu iptables
### END INIT INFO
# Author: MyDeb
# Original script :"http://www.gentoo-quebec.org/wiki/index.php/Utilisation_de_Iptables_comme_Firewall/Gateway"
# Do NOT "set -e"
# PATH should only include /usr/* if it runs after the mountnfs.sh script
PATH=/sbin:/usr/sbin:/bin:/usr/bin
DESC="Firewall"
NAME=Firewall
PIDFILE=/var/run/$NAME.pid
RULESDIR=/etc/$NAME/
SCRIPTNAME=/etc/init.d/$NAME
# Read configuration variable file if it is present
[ -r /etc/default/$NAME ] && . /etc/default/$NAME
# Load the VERBOSE setting and other rcS variables
. /lib/init/vars.sh
# Define LSB log_* functions.
# Depend on lsb-base (>= 3.2-14) to ensure that this file is present
# and status_of_proc is working.
. /lib/lsb/init-functions
#
# Function that starts the daemon/service
#
empty_rules() {
        # We resets all rules default value accepted. That is to say, is allowed to pass traffic.
        $IPT -P INPUT ACCEPT
        $IPT -P FORWARD ACCEPT
        $IPT -P OUTPUT ACCEPT
        $IPT -t nat -P PREROUTING ACCEPT
        $IPT -t nat -P POSTROUTING ACCEPT
        $IPT -t nat -P OUTPUT ACCEPT
        $IPT -t mangle -P PREROUTING ACCEPT
        $IPT -t mangle -P OUTPUT ACCEPT
        #We flush iptables chains.
        $IPT -F
        #We flush iptables user's chains.
        $IPT -X
        #We flush all other iptables tables.
        $IPT -t nat -F
        $IPT -t mangle -F
        $IPT -t nat -X
        $IPT -t mangle -X
}
base_rules() {
	modprobe ip_tables
	modprobe ip_nat_irc
	modprobe ip_conntrack_irc
	modprobe iptable_filter
	modprobe iptable_nat
	#if you plan to use an FTP server, unmark the two following lines
	#modprobe ip_nat_ftp
	#modprobe ip_conntrack_ftp
        # we block all traffic.
        $IPT -P INPUT DROP
        $IPT -P OUTPUT DROP
        $IPT -P FORWARD DROP
}
start_masquerade() {
        #enable IP FORWARDING
        echo 1 > /proc/sys/net/ipv4/ip_forward
        # we start with the rules of masquerade (ipforwarding)
        # This option allows you to use the notion of masquerade, because by using this function, the Firewall
	# is used as a gateway which will act as if all client requests were in fact the Firewall
        $IPT -t nat -A POSTROUTING -o $WAN_IFACE -j MASQUERADE
}
firewall_rules() {
        #for a transparent proxy, weredirect port 80 to 3128(or other)
        #$IPT -t nat -A PREROUTING -s $LAN_NET -p tcp -m tcp --dport 80 -j REDIRECT --to-ports 3128
        # Create User tables
        $IPT -N bad_packets
        $IPT -N bad_tcp_packets
        $IPT -N icmp_packets
        # Table used to manage the UDP packets coming from the Internet.
        $IPT -N udp_inbound
        # table used to block UDP traffic that goes out of the lan and will go on internet.Par default, it passes the UDP traffic from the LAN.
        $IPT -N udp_outbound
        # Table used if you have a ssh or ftp or any other service you want returns available on the internet.
        # By default, only traffic initiated by the LAN will be able to enter, because we do not accept traffic that wants to enter without reason.
        $IPT -N tcp_inbound
        # Table used to block TCP traffic going out of momentum and that will go on internet.Par default, it passes the TCP traffic from the LAN.
        $IPT -N tcp_outbound
        ########Fonction ########
        # bad_packets chain
        # This function will be used when a packet is going to want internet through the firewall or WAN interface.
        #########################
        # This rule is very important because it validates that the traffic from WAN has not been modified to act as if the packet in question proviennait your LAN.
        # This is impossible, because if the packet is from the internet, it can not have an address from your LAN, and we must protect not be hacker.
        # We drop the packet in order to meet our striker.
        # It enables logging
        $IPT -A bad_packets -p ALL -i $WAN_IFACE -s $LAN_NET -j LOG --log-prefix "fp=bad_packets:2 a=DROP "
        # We drop the packet.
        $IPT -A bad_packets -p ALL -i $WAN_IFACE -s $LAN_NET -j DROP
        # If the packet is detected as invalid, it enables logging.
        $IPT -A bad_packets -p ALL -m state --state INVALID -j LOG --log-prefix "fp=bad_packets:1 a=DROP "
        # We drop the packet.
        $IPT -A bad_packets -p ALL -m state --state INVALID -j DROP
        # If the packet is still valid record at this stage, we continue our validation by calling the function bad_tcp_packets
        $IPT -A bad_packets -p tcp -j bad_tcp_packets
        # If everything is validated, it returns to the caller
        $IPT -A bad_packets -p ALL -j RETURN
        ########Fonction ########
        # bad_tcp_packets chain
        # All TCP packets will pass through this function.
        # In addition, if there is a new connection happens on the Firewall, should it sends a SYN packet. If this is not the case, we are in the presence of a port scanner.
        # Therefore, we will drop the packet to avoid answering and show signs of life in our striker.
        #########################
        # If the function is called and the source is our internal network (LAN), we not perform verification because we trust our internal network (LAN) at the error packets.
        $IPT -A bad_tcp_packets -p tcp -i $LAN_IFACE -j RETURN
        # If the function is called and the source is our internal wireless network (WLAN), we not perform verification because we trust our internal wireless network (WLAN) at the error packets.
        $IPT -A bad_tcp_packets -p tcp -i $WLAN_IFACE -j RETURN
        # However, I originally did apply this filter to the forward chain
        # for packets originating from the internal network.  While I have
        # not conclusively determined its effect, it appears to have the
        # interesting side effect of blocking some of the ad systems.
        # Apparently some ad systems have the browser initiate a NEW
        # connection that is not flagged as a syn packet to retrieve
        # the ad image.  If you wish to experiment further comment the
        # rule above. If you try it, you may also wish to uncomment the
        # rule below.  It will keep those packets from being logged.
        # There are a lot of them.
        # $IPT -A bad_tcp_packets -p tcp -i $LAN_IFACE ! --syn -m state --state NEW -j DROP
	# If we are in the presence of a new connection attempt on our Firewall and it was not the syn flag is not normal, it does not respond.
        # This is possibly an attack.
        # It logs the event
        $IPT -A bad_tcp_packets -p tcp ! --syn -m state --state NEW -j LOG --log-prefix "fp=bad_tcp_packets:1 a=DROP "
        # We drop the packet
        $IPT -A bad_tcp_packets -p tcp ! --syn -m state --state NEW -j DROP
        # If there is something that does not work at the flags, it logs and drop.
        $IPT -A bad_tcp_packets -p tcp --tcp-flags ALL NONE -j LOG --log-prefix "fp=bad_tcp_packets:2 a=DROP "
        $IPT -A bad_tcp_packets -p tcp --tcp-flags ALL NONE -j DROP
        $IPT -A bad_tcp_packets -p tcp --tcp-flags ALL ALL -j LOG --log-prefix "fp=bad_tcp_packets:3 a=DROP "
        $IPT -A bad_tcp_packets -p tcp --tcp-flags ALL ALL -j DROP
        $IPT -A bad_tcp_packets -p tcp --tcp-flags ALL FIN,URG,PSH -j LOG --log-prefix "fp=bad_tcp_packets:4 a=DROP "
        $IPT -A bad_tcp_packets -p tcp --tcp-flags ALL FIN,URG,PSH -j DROP
        $IPT -A bad_tcp_packets -p tcp --tcp-flags ALL SYN,RST,ACK,FIN,URG -j LOG --log-prefix "fp=bad_tcp_packets:5 a=DROP "
        $IPT -A bad_tcp_packets -p tcp --tcp-flags ALL SYN,RST,ACK,FIN,URG -j DROP
        $IPT -A bad_tcp_packets -p tcp --tcp-flags SYN,RST SYN,RST -j LOG --log-prefix "fp=bad_tcp_packets:6 a=DROP "
        $IPT -A bad_tcp_packets -p tcp --tcp-flags SYN,RST SYN,RST -j DROP
        $IPT -A bad_tcp_packets -p tcp --tcp-flags SYN,FIN SYN,FIN -j LOG --log-prefix "fp=bad_tcp_packets:7 a=DROP "
        $IPT -A bad_tcp_packets -p tcp --tcp-flags SYN,FIN SYN,FIN -j DROP
        # If there is no anomaly, it returns to the caller.
        $IPT -A bad_tcp_packets -p tcp -j RETURN
        ########Fonction ########
        # icmp_packets chain
        # This function is used only for ICMP packets from the Internet (WAN).
        # Return Type 8 (Echo Request) is not accepted by default because it does not answer to ping.
        # The return type 11 (Time Exceeded) is accepted because it is the only one that is absolutely necessary for it to work.
        # The ICMP packets will give us the status of a request, a connection refused etc ...
        # For more details : http://www.ee.siue.edu/~rwalden/networking/icmp.html
        #########################
	# The ICMP packets from layer 2 (data link) of the OSI layer and according to the standard, it is not acceptable to have packets that use fragmentation.
        # When this this this, we are in the presence of denial of service (DOS).
        # It logs the event and on the packet drop.
        $IPT -A icmp_packets --fragment -p ICMP -j LOG --log-prefix "fp=icmp_packets:1 a=DROP "
        $IPT -A icmp_packets --fragment -p ICMP -j DROP
        # If you want to respond to ping, you must enable the following 3 lines:
        # $IPT -A icmp_packets -p ICMP -s 0/0 --icmp-type 8 -j LOG --log-prefix "fp=icmp_packets:2 a=ACCEPT "
        # $IPT -A icmp_packets -p ICMP -s 0/0 --icmp-type 8 -j ACCEPT
        # By default, we drop the ICMP ping packet type because we do not want to answer.
        $IPT -A icmp_packets -p ICMP -s 0/0 --icmp-type 8 -j DROP
        # We only accept ICMP packets that type 11 (Timeout)
        $IPT -A icmp_packets -p ICMP -s 0/0 --icmp-type 11 -j ACCEPT
        # If no abnormality is returned to the caller.
        $IPT -A icmp_packets -p ICMP -j RETURN
        ########Fonction ########
        # udp_inbound chain
	# This function handles UDP packets in from the Internet (WAN).
        # It will handle the packets that come from a new connection only, new.
        #########################
        # Netbios packets are dropped by default if they are from the internet.
        $IPT -A udp_inbound -p UDP -s 0/0 --destination-port 137 -j DROP
        $IPT -A udp_inbound -p UDP -s 0/0 --destination-port 138 -j DROP
        # The packets that want to communicate via port 113 is discarded.
        $IPT -A udp_inbound -p UDP -s 0/0 --destination-port 113 -j REJECT
        # It lets the DHCP
        $IPT -A udp_inbound -p UDP -s 0/0 --source-port 67 --destination-port 68 -j ACCEPT
        # If there is no discrepancy, it returns to the caller
        $IPT -A udp_inbound -p UDP -j RETURN
        ########Fonction ########
        # udp_outbound chain
	# This function is used to output the block UDP ports so that clients on the LAN to communicate to the internet (WAN) with them.
        # This function is only used with FORWARD.
        #########################
        # If nothing is blocking by default, we accept that the packet can pass through the LAN to the Internet to collect.
        $IPT -A udp_outbound -p UDP -s 0/0 -j ACCEPT
        ########Fonction ########
        # tcp_inbound chain
	# This function is used to allow TCP connections from the internet to reach your LAN.
        # By default, if the packet makes it here, it will be Dropped by default, because the default font is just drop.
        # This is where you need to enable ports for servers that you host in your LAN.
        # Note that everything is comment you are protecting.
        #########################
        ### Protection against brute force attacks for FTP
        $IPT -A tcp_inbound -p tcp -s 0/0 --destination-port 21 -m state --state NEW -m recent --set
        $IPT -A tcp_inbound -p tcp -s 0/0 --destination-port 21 -m state --state NEW -m recent --update --seconds 600 --hitcount 3 -j DROP
        ### Protection against brute force attacks for SSH
        $IPT -A tcp_inbound -p tcp -s 0/0 --destination-port 10022 -m state --state NEW -m recent --set
        $IPT -A tcp_inbound -p tcp -s 0/0 --destination-port 10022 -m state --state NEW -m recent --update --seconds 600 --hitcount 3 -j DROP
        # Activating a FTP server
        # FTP (Control)
        $IPT -A tcp_inbound -p TCP -s 0/0 --destination-port 21 -j ACCEPT
        # FTP (Data)
        $IPT -A tcp_inbound -p TCP -s 0/0 --source-port 20 -j ACCEPT
        # FTP (Passive Port)
        $IPT -A tcp_inbound -p TCP -s 0/0 --source-port 62000:62050 -j ACCEPT
	#$IPT -A PREROUTING -i $WAN_IFACE -p TCP --destination-port 62000:62050 -j DNAT --to-destination $LAN_IP
	#$IPT -A PREROUTING -i $WAN_IFACE -p TCP --destination-port 62000:62050 -j DNAT
        # SSH
        $IPT -A tcp_inbound -p TCP -s 0/0 --destination-port 10022 -j ACCEPT
        # Web
        $IPT -A tcp_inbound -p TCP -s 0/0 --destination-port 80 -j ACCEPT
        # Webmin
        $IPT -A tcp_inbound -p TCP -s 0/0 --destination-port 10000 -j ACCEPT
        # SMTP
        $IPT -A tcp_inbound -p TCP -s 0/0 --destination-port 25 -j ACCEPT
        # Allow ICQ protocol
        # The ICQ PROTOCOL must be able to open new connections on the client and in this case, must be allowed to open a connection from the outside on some ports.
        #$IPT -A tcp_inbound -p TCP -s 0/0 --destination-port 5000:5100 -j ACCEPT
        # Allow the transfer of files via MSN Messenger
        #$IPT -A tcp_inbound -p TCP -s 0/0 --destination-port 6891:6900 -j ACCEPT
        # If it is not one of the exceptions, it returns to the caller and the packet is dropped on the floor.
        $IPT -A tcp_inbound -p TCP -j RETURN
        ########Fonction ########
        # tcp_outbound chain
	# This function is used to output the block TCP packets from the LAN.
	# This function is used only by FORWARD
        #########################
        # IRC protocol is blocked
        # $IPT -A tcp_outbound -p TCP -s 0/0 --destination-port 194 -j REJECT
        # Telnet protocol is blocked
        #$IPT -A tcp_outbound -p TCP -s 0/0 --destination-port 23 -j REJECT
        # SSH protocol is blocked
        # $IPT -A tcp_outbound -p TCP -s 0/0 --destination-port 22 -j REJECT
        # FTP protocol is blocked
        #$IPT -A tcp_outbound -p TCP -s 0/0 --destination-port 21 -j REJECT
        #$IPT -A tcp_outbound -p TCP -s 0/0 --destination-port 20 -j REJECT
        # AIM protocol is blocked
        #$IPT -A tcp_outbound -p TCP -s 0/0 --destination-port 5190 -j REJECT
        #$IPT -A tcp_outbound -p TCP -s 0/0 --destination-port 4443 -j REJECT
        # MSN Messenger protocol is blocked
        # $IPT -A tcp_outbound -p TCP -s 0/0 --destination-port 1863 -j REJECT
        # By default, it passes while output from the LAN interface.
        $IPT -A tcp_outbound -p TCP -s 0/0 -j ACCEPT
        ############## Events managed by the FIREWALL ############################
        #
	# The INPUT Chain function
        # All packets entering either the LAN or WAN call this function
        ###############################################################################
        # The Loopback interface passes without restriction
        $IPT -A INPUT -p ALL -i $LOOP_IFACE -j ACCEPT
        # Everything that comes to pass in the bad_packets function and if there is an error, drop the packet.
        $IPT -A INPUT -p ALL -j bad_packets
        # DOCSIS compliant cable modems
        # Some DOCSIS compliant cable modems send IGMP multicasts to find
        # connected PCs.  The multicast packets have the destination address
        # 224.0.0.1.  You can accept them.  If you choose to do so,
        # Uncomment the rule to ACCEPT them and comment the rule to DROP
        # them  The firewall will drop them here by default to avoid
        # cluttering the log.  The firewall will drop all multicasts
        # to the entire subnet (224.0.0.1) by default.  To only affect
        # IGMP multicasts, change '-p ALL' to '-p 2'.  Of course,
        # if they aren't accepted elsewhere, it will only ensure that
        # multicasts on other protocols are logged.
        # Drop them without logging.
	# Some cable modems must communicate to the address 224.0.0.1 otherwise they will not work.
        # We accept it or drop.
        $IPT -A INPUT -p ALL -d 224.0.0.1 -j DROP
        # $IPT -A INPUT -p ALL -d 224.0.0.1 -j ACCEPT
	# Allow local network to move freely and communicate with the Firewall
        $IPT -A INPUT -p ALL -i $LAN_IFACE -s $LAN_NET -j ACCEPT
        $IPT -A INPUT -p ALL -i $LAN_IFACE -d $LAN_BCAST -j ACCEPT
        $IPT -A INPUT -p ALL -i $WLAN_IFACE -s $LAN_NET -j ACCEPT
        $IPT -A INPUT -p ALL -i $WLAN_IFACE -d $LAN_BCAST -j ACCEPT
        # We only accept connections from the internet that have the status ESTABLISHED or RELATED, because it guarantees us that this is the LAN that initiated a connection.
        $IPT -A INPUT -p ALL -i $WAN_IFACE -m state --state ESTABLISHED,RELATED -j ACCEPT
        # Otherwise, you must validate if the packet can pass.
        $IPT -A INPUT -p TCP -i $WAN_IFACE -j tcp_inbound
        $IPT -A INPUT -p UDP -i $WAN_IFACE -j udp_inbound
        $IPT -A INPUT -p ICMP -i $WAN_IFACE -j icmp_packets
        # If a broadcast packet arrives far, we drop.
        $IPT -A INPUT -m pkttype --pkt-type broadcast -j DROP
        # If for any reason the packet is made here, we can examine logs for later.
        $IPT -A INPUT -j LOG --log-prefix "fp=INPUT:99 a=DROP "
        ###############################################################################
	# The Chain FORWARD function
        # This function is used to route packets to the firewall or treat those Firewall sends.
        ###############################################################################
        #we see if packjet is UPNP packet
        $IPT -A FORWARD -p ALL -j FW_UPNP
        # It checks whether the packet is valid
        $IPT -A FORWARD -p ALL -j bad_packets
        # We check if we have the right to send the TCP packet.
        $IPT -A FORWARD -p tcp -i $LAN_IFACE -j tcp_outbound
        $IPT -A FORWARD -p tcp -i $WLAN_IFACE -j tcp_outbound
        # We check if we have the right to send the UDP packet.
        $IPT -A FORWARD -p udp -i $LAN_IFACE -j udp_outbound
        $IPT -A FORWARD -p udp -i $WLAN_IFACE -j udp_outbound
        # If everything is correct, we agree to send
        $IPT -A FORWARD -p ALL -i $LAN_IFACE -j ACCEPT
        $IPT -A FORWARD -p ALL -i $WLAN_IFACE -j ACCEPT
        #If the packet comes from the internet and it was initiated by the LAN, it is accepted.
        $IPT -A FORWARD -i $WAN_IFACE -m state --state ESTABLISHED,RELATED -j ACCEPT
        # If you come here, it logs the packet is in error and the drop.
        $IPT -A FORWARD -j LOG --log-prefix "fp=FORWARD:99 a=DROP "
        ###############################################################################
	# The Chain OUTPUT function
        # This function is used for the FIREWALL can send packets on the internet.
        ###############################################################################
        # We let out everything except ICMP packets that are invalid.
        $IPT -A OUTPUT -m state -p icmp --state INVALID -j DROP
        # Traffic that walks on the Loopback Interface
        $IPT -A OUTPUT -p ALL -s $LOOP_IP -j ACCEPT
        $IPT -A OUTPUT -p ALL -o $LOOP_IFACE -j ACCEPT
        # Traffic that walks on the LAN
        $IPT -A OUTPUT -p ALL -s $LAN_IP -j ACCEPT
        $IPT -A OUTPUT -p ALL -o $LAN_IFACE -j ACCEPT
        $IPT -A OUTPUT -p ALL -o $WLAN_IFACE -j ACCEPT
        # The traffic that comes to the internet
        $IPT -A OUTPUT -p ALL -o $WAN_IFACE -j ACCEPT
        # If we get there, it logs the packet and drop it.
        $IPT -A OUTPUT -j LOG --log-prefix "fp=OUTPUT:99 a=DROP "
}
stop_masquerade() {
        # Stop IP forwarding
        echo 0 > /proc/sys/net/ipv4/ip_forward
        #Empty nat-masquerade tables.
        iptables -t nat -F
}
case "$1" in
  start)
    echo -n "Setting up firewall..."
    empty_rules
    base_rules
    firewall_rules
    start_masquerade
    echo " done."
    ;;
  restart)
    echo -n "Reloading firewall rules..."
    stop_masquerade
    empty_rules
    base_rules
    firewall_rules
    start_masquerade
    echo " done."
    ;;
  stop)
    echo -n "Stopping firewall..."
    stop_masquerade
    empty_rules
    echo " done."
    ;;
  *)
    echo "Usage: $0 {start|stop|restart}"
    exit 1
esac
exit 0
Sauvegardez-le et rendez-le exécutable :
chmod +x /etc/init.d/Firewall
Maintenant, créez un fichier /etc/default/Firewall :
nano /etc/default/Firewall
et copiez-y les paramètres suivants en les adaptant à votre besoin :
#Fichier de configuration du service Firewall
#Chemin d'iptables
IPT=/sbin/iptables
IPT="/sbin/iptables"
IPTS="/sbin/iptables-save"
IPTR="/sbin/iptables-restore"
#le nom du pont réseau
bridge=gateway0
#Interface cote lan
LAN_IFACE="eth1"
#Interface cote Box
WAN_IFACE="eth0"
#Interface wi fi
#WLAN_IFACE="wlan0"
#la plage reseau cote lan (masque correspondant a un reseau de classe C)
LAN_NET="zzz.zzz.zzz.0/24"
#Adresse IP Passerelle(Firewall) cote LAN
LAN_IP="zzz.zzz.zzz.zzz"
#Adresse de Broadcast
LAN_BCAST="yyy.yyy.yyy.255"
# Interface Loopback
LOOP_IFACE="lo"
LOOP_IP="127.0.0.1"
Sauvegardez le.
Dernier point avant l’exécution du service, il faut l’inscrire dans la liste des services à démarrer avec le serveur (toujours depuis le répertoire /etc/init.d) :
updaterc.d Firewall defaults 99
Voila, il ne vous reste plus qu’a exécuter le service et votre pare-feu devrait être en place, de plus, les postes de travail du LAN devraient avoir accès à Internet.
Une fois toutes ces modifications effectuées, et uniquement si le redémarrage manuel du service networking s’est correctement déroulé, je vous conseille d’effectuer un redémarrage du serveur, avec ecran connecté, afin de vérifier que tout se passe correctement.
Je « flirte » avec Linux depuis 2005 et j’ai complétement basculé dans le libre depuis plus de 3 ans.
- Partage de fichier entre Samba, Docker et SELinux – 29/11/2017
- Mise à jour vers Windows 10 : Pas assez de mémoire vive… – 24/08/2015
- Améliorer les performances RAID – 15/05/2015